Thursday, March 15, 2018

low Iodine Diet info and tips

Low Iodine Diet for whole body scan prep

Let me start by stating this caveat: this was my diet based on the guidelines given to me by my nurse. You may be given other guidelines by your clinicians. Always refer to what has been given to you by your team first.

What makes me an expert?  I'm not!  But what I am is a food blogger who has many food sensitivities and has become skilled in food substitutions, especially on a tight budget.
I was diagnosed with papallary thyroid cancer in late November 2014.  I had a total thyroidectomy because I had a mass on each hemisphere, a "sticky" 4cm on the left. The removal was not 100%.  I'm considered persistent. In July 2018 I will be facing my 3rd stimulated whole body scan needing low iodine diet (l.I.d.) prep of at least 2 weeks.

Why low iodine diet?  Iodine is a naturally occurring mineral that is needed to produce a hormone in your thyroid called thyroxine. By going on l.I.d. the thyroid will be starved of it so, when given radioactive iodine, any remaining thyroid cells will soak up that iodine and light up under the whole body scan.

Iodine isn't just in iodine salt. Broad list of other foods to avoid:

  • Egg yolks
  • dairy
  • Anything from the sea
  • Canned foods
  • Seasoning mixes
  • Soy
My nurse is always keen to point out that it's "low" iodine not "no" iodine. Obviously, don't eat your way through the Cheesecake Factory's menu but don't put yourself under the pressure to not eat one tiny bit of iodine. It's hard. It's especially hard these days when we eat a lot of processed food. 

Tips
  • Find a friend or family member to help
  • Meal planning and prep is key
  • Take a field trip to the market ahead of time
  • Never hesitate to call your medical team
  • Read labels
  • Google is your friend, bring it shopping with you to help decipher ingredients
  • Don't eat out
  • Have non-iodine salt will travel
  • Find a splurge substitute (for me it's sorbet)
  • Remind yourself that a bottle of pinot gris is iodine free!..... ok, Maybe that one is for me

Most recipes on my blog are from scratch and can easily be made l.I.d. friendly just by switching out salt or using vegan/soy free substitute.  I will be posting more specifically l.I.d. menu plans and recipes very soon. 


Sunday, June 26, 2016

Hearty Egg Drop Soup

I've been stocking up on eggs lately.  In my area, upstate NY, eggs at Aldi grocery store have been running at $0.79.  I was trying to think of different things to do with eggs for dinner, I think my husband is getting sick of quiche.  Then my grandfather popped into my head.  He loved soup.  After my grandmother passed and he was diagnosed with lung cancer, it was about all he ate.  He spent the summer with us the year before he died and taught me how to make egg drop soup.  Egg drop soup, although super delicious, is not a meal in and of itself.  Time to use my CSA to make a nice hearty egg drop soup.  This recipe is super quick and easy.  Start to finish it only takes about 20 minutes.


Hearty Egg Drop Soup

32oz stock, chicken or vegetable 
32oz water (I refill the stock container with water)
4 leaves Napa cabbage, chopped, about 2 cups
3 spring onions, chopped, about 1/2 cup
3 garlic scapes, chopped, about 1/2 cup
     *minced garlic can be subbed
1/4 soy sauce (I use Kikkomen gluten free)
salt and pepper to taste
3 large eggs, lightly beaten
 2 chicken sausages **optional


 In large pot bring to boil all ingredients except eggs.  Reduce to simmer and simmer about 5 minutes.
 Lightly beat 3 eggs

Slowly pour eggs into pot.
Simmer another 5 minutes.

Eat and enjoy!

This served my husband and I but could probably easily feed 4 people.  

Thursday, June 16, 2016

Early Summer Cobbler

Its summer again!  Summer for me means CSA.  Now that this is my 4th summer of CSA, its getting a bit harder to discover new veggies and new ways to make them.  Just when I was worried my cuinary adventures were over, rhubarb happened!  Rhubarb!  I think I've only hadd it once or twice in my life.  I know it goes well with early summer berries.  My mother informed me she had blueberries and stawberries rotting in her fridge while she was out of town.  Rhubarb, bueberries, strawberries?  Sounds like the makings of a pie to me.  The problem with pie in my world is that I'm gluten intollerant and despise making crust.  Cobbler it it!

(Vegan/Gluten Free) Early Summer Cobbler

Filling:
4 C rhubarb, blueberry and strawberry, cut
      (foor exact copy I used 2c rhubarb, 1c blueberry, 1c strawberry)
2 tsp lemon juice
1/3 C sugar
1/3 C maple syrup
2 Tbs corn starch


Topping:
1/3 C brown sugar (or 1/3c sugar plus 1tsp molasses)
3/4 C rolled oats
1/2 C sorghum four
pinch of salt
1/3 C melted "butter" (I use Earth Balance soy-free)

Preheat oven to 350
Grease 8x8 glass pan or baking vessel of choice, I used large ramekins

Mix together all filling ingredients except fruit.  
Once well incorporated, toss fruit in mixture until evenly coated.

 Pour into baking dish.


Mix together all topping ingredients except "butter".  Once ingredients are well mixed, add melted "butter" and stir well.  Evenly top fruit mixture with topping.
Bake 35 minutes until topping is golden and fruit is bubbling.

Wednesday, August 19, 2015

Gluten Free, Vegan Carrot muffins

Carrots!  So many carrots!  We got carrots in our Shared Roots Farm share and some donated at an event I attended, on top of the leftover carrots from the week before.  My philosophy is usually to make soup and/or freeze things but our freezer was full this week.  Im a big fan of carrot cake.  I have also had to eliminate eggs and dairy from my diet from time to time because of medical treatments I am going to do.  I sort of based this recipe on the recipe for zucchini bread that I previously posted.  There is no animal products, no gluten, no added sugar.  These muffins freeze and defrost very well in the car on a road trip or in a lunch box.


Carrot Muffins:
makes 10 - 12

1 c carrots, grated
1 c natural applesauce
1 tsp vanilla
1 c oat four (make sure its gluten free)
1 c rolled or steel cut oats (again, gluten free)
3/4 tsp baking soda
1 tsp baking powder
1/4 tsp cinnamon
1/4 tsp nutmeg
1/8 tsp clove
1/2 c raisins
**can add 1/4 c sugar for sweeter muffins

Preheat oven to 350f and grease a 12 muffin tin

In a bowl mix together carrots, applesauce, vanilla (sugar).
In seperate bowl mix together oat flour, oats, baking soda, powder, cinnamon, nutmeg and clove.
Add wet ingredients into dry and mix well, making sure all flour and oats are well incorporated.  Mix in raisins.


Divide muffin mix into tin.  Shape muffins *these muffins wont have a lot of rise that helps make that "muffin shape".  
Bake 20 - 25 minutes until golden.  Allow to cool in tin 5 minutes before removing.


Dijon dill dressing and scape & scallion dressing

They say that variety is the spice of life.  Sometimes, especially in early weeks of receiving my Shared Roots Farm share, I got a lot of the same thing; it's the nature of farming.  I've had to come up with many new ways to keep the same things "different", and no one wants a boring salad.  I came up with 2 new saad dressings this year, a dijon dill and a garlic scape & scallion dressing (using my go-to pesto ingredients to make a dressing).  Each of these recipes will be enough to dress a large salad for 4 people.

Dijon Dill Dressing
2 tbs Dijon mustard
3 tbs olive oil
5 tbs vinegar
1 tbs honey
1 tbs lemon juice


Whisk together all ingredients.  Refridgerate 1 hour before using.
**Goes well with a simple salad and dill turkey burgers

Scape and Scallion dressing
2 tbs scallions, finely minced
2 tbs garlic scapes, finely minced
1 1/2 tbs mustard
1/4 c olive oil
1/8 c vinegar
1/4 c orange juice

Whisk together all ingredients.  Refridgerate 1 hour before using.
**Goes well with a citrus salmon


Monday, August 17, 2015

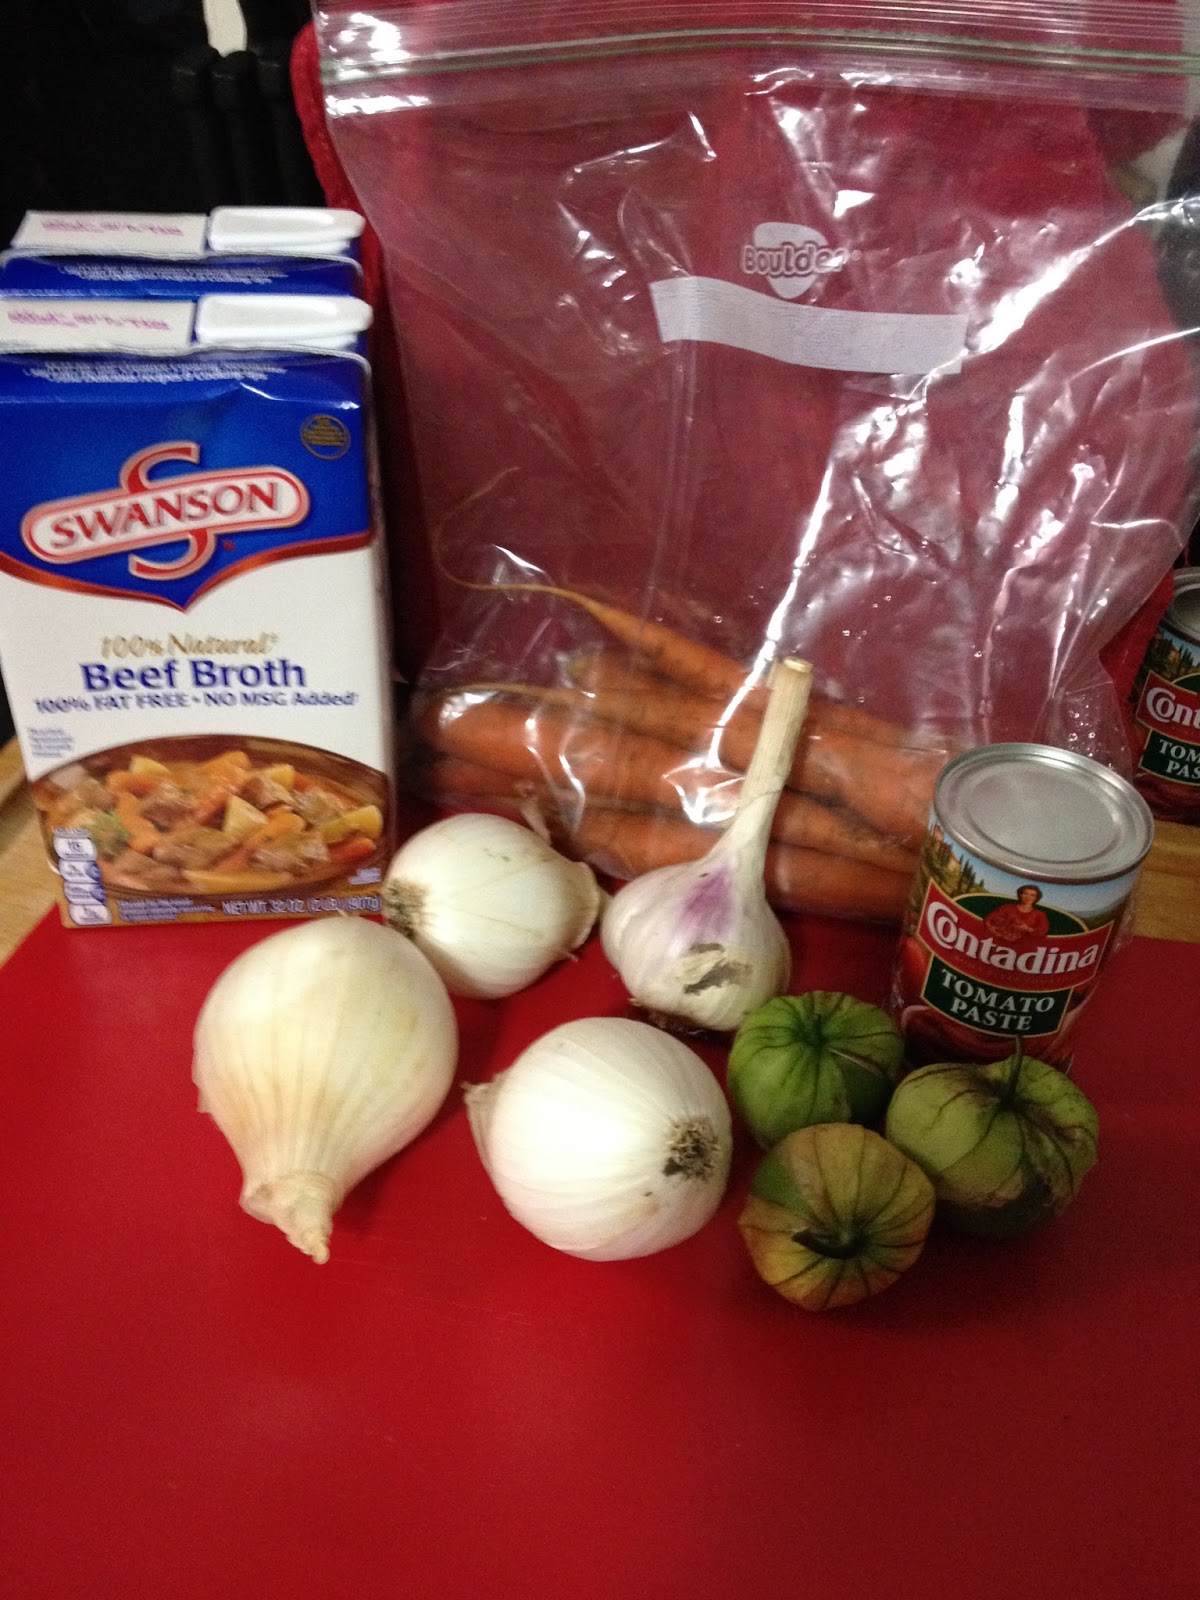
Tomato Vegetable Soup

This week I got another "new" vegetable in my CSA from Shared Roots Farm, tomatillos.  Tomatillos are a South American husked tomato, they can be a variety of colors.  They are slightly sweeter then a traditional tomato.  Tomatillos are what are used in salsa verde.
Im not a huge fan of Mexican food, I dont like the heat.  Making salsa verde with the tomatillos was kinda out of the question since I dont eat chilis.  When in doubt, make soup!


Tomato Vegetable Soup:
serves 8
3 tbs margaine/butter
1/4c scallions, minced
3 onions, diced
3 cloves garlic, minced
6 oz tomato paste
2 (32oz) boxes beef stock
4 c water
1 c carrots, chopped
1 c celery, chopped
3 tomatillos, diced


In a large, heavy bottom pot, heat margraine.  Saute scallions, garlic and onion until carmelized, stirring often to keep from sticking.


Add tomato paste and stir well.
Add stock and water.  Bring to a boil.
Add carrots, celery and tomatillos.  Simmer 15 minutes.
**for a little extra something add cooked rice or quinoa just before serving


Sunday, August 16, 2015

CSA pro-tips

I start this post with an apology.  When the CSA season began and I started blogging again, I vowed to post weeky.  Life keeps happening.  My husband and I have thrown ourselves into a new hobby, and I have been making dresses for myself.  Meanwhile, I have a small stockpile of new recipes waiting to be blogged.   That being said, off we go with a couple tips that I have learned that will make having a CSA less daunting.


CSA Tips:
I would in no way call myself a "pro" when it comes to this veggie thing, I'm still coming across new foods and researching new ways of cooking.  I have, through trial and error, learned a few things over the last 3 years that I wish someone had emparted to me.
1.  Picking CSA pick-up date: When you get your CSA contract, like my local CSA, they may give you options of pick up days or times.  Choose a day and time that allows you to have time to process through your veggies.  I dont work, when I chose my day/time the first year, I didnt give it much thought.  I use to pick it up on a Friday at 5pm.  This worked for me the first year; my husband could walk to work and got paid on a Wednesday.  I would go grocery shopping on a Wednesday or Thursday but since I didnt know what was in my CSA, I often had to grocery shop again to plan around the vegetables I recieved.  This year I gave it more forthought.  My husband now works Monday through Friday, gets paid on a Friday, I grocery shop pay days.  I chose a Wednesday CSA pick up day this season so I could have my vegetables before I went grocery shopping.
2.  Do some recon:  If your CSA is anything like mine, you may not know ahead of time what you are getting in your CSA each week.  It helps if you can check to see what your CSA posted the same week last year.  I have friends on my facebook who are part of a CSA in a different area in my state, they often post what they recieved.  Check the Farmers Almanac when all else fails, it usually predicts what vegetables will come into season certain weeks.
3.  Be prepared:  Before going to pick up your CSA, make sure you have everything you need or everything ready for when you come home.  This means different things depending on how you work in the kitchen.  Before I leave the house I make sure the kitchen is clean and dishes wash, especialy those I know I will need like my food processor, salad spinner or mandalin.  If you compost, make sure your bin is empty.  I usually put a large pot of water on the stove (not turned on!) in preparation of blanching anything I know I want to freeze.  I also make sure Im stocked on things like olive oil, vinegar and freezer bags.
4.  Know you veggies:  As I said, I wouldnt call myself a "pro" because there are still some veggies I dont know.  Before you leave your CSA pick up, review your vegetables to make sure you can identify everything.  Dont be afraid to ask!  If you dont recognize something, generally, the people running the CSA know what it is.  When in doubt ask facebook or do a Google image search.
5.  Look for recipes or ideas:  Once you know what you have, take some time to look for recipes.  There are times when you get beets three weeks in a row.  Check out some new ways to cook things.  Im constantly surprised with new combinations I have never thought of before.  Carrot greens and swiss quiche, dill turkey burgers, Google can open a whole new avenue of tastes.
6.   Set aside time: This kind of goes with the tip of chosing a day and time that fits your schedule.  Once you get home with your CSA set aside time to do all the prep and processing right away, this will save you time later.  See if you have anything leftover from the week before; if its still good freeze it, make pesto, if its gone bad, compost it.  Once you've gotten rid of the old, start dealing with the new.  Remove butts and wash greens right away, putting them in labeled bags in the crisper so they are ready to go for salads.  Remove herbs from stems and either make pesto or put them in a zip bag in the fridge or even set them up for drying (in dehydrator or a baking sheet on lowest heat in oven).  Wash, blanch and freeze whatever greens you dont think you will use right away.   If you have extra carrots or zucchini, grate it and freeze it for bread or muffins in the winter.

Thursday, July 16, 2015

Radish and Cabbage No Mayo Slaw

This is a quick and easy recipe, even easier if you have a mandolin.  I'll admit, I'm terrible about measuring.  The fact that I have to figure out measurements for people to follow the recipe is a bit diffiult for me.  That being said, you may need to tweak this recipe a litte for your own taste.


Radish and Cabbage No Mayo Slaw

1 medium head of Napa cabbage, shredded
6 radishes, sliced thin
1/4 c balsamic vinegar
1/8 c (4 tbs) olive oil
2 tbs pesto of choice 
1 tbs lemon juice
Salt & pepper to taste

Put shredded cabbage in a strainer/colander over a bowl or in a clean sink, salt it well.  Let set for 5 - 10 minutes, this will draw out some of the water from the cabbage.  Squeeze out excess liquid.  
Mix together vinegar, oil, lemon juice, pesto, salt and pepper.  


Place cabbage and radishes into a large bowl.  Toss veggies with the vinegar mixture.
Set aside in fridge for 30 minutes before serving.  (There may be excess liquid at the bottom of the bowl, either pour it off or serve with a slotted spoon)


Gluten free, vegan Zucchini muffins

I know, most people cringe at the thought of gluten free and vegan.  I swear, if i hadnt made this recipe, I woudn't think there was anything "different" about these muffins. No butter, no eggs, no freaky ingredients that you only find at specialty stores.  These muffins also freeze and defrost well.  This is also great for low iodine diets, just sub non-iodized salt.

Zucchini Muffins

1 3/4 c (gluten free) oat flour**
1 tsp baking power
1/2 tsp baking soda
1 tsp salt
1/2 cup light brown sugar (or 1/2 cup sugar + 1/2 tbs molasses)
1 c apple sauce (I used homemade chunky)
1 tsp vanilla
1 c grated zucchini, packed

Preheat oven to 350
Grease muffin tin


Mix together dry ingredients.  Mix in wet ingredients until well blended.  Pour into prepareed tin about 3/4 full.
Bake 30 to 45 minutes.  Check with toothpick, should come out clean.
Allow to cool 5 minutes before taking out of tins.


** Oat Flour: Not all oats can be considered gluten free because of potential contamination.  If you arent super gluten sensitive most oats are okay, but if you are Celiac, make sure it is labeled "gluten free".
To make your own oat flour, simply grind traditional oats in a grinder or high speed food processor.


Friday, June 26, 2015

Pesto and Spinach Chicken Roulade with Kohlrabi Fritters

I had planned on writing at least 1 blog post a week with a new recipe.   Last week I got behind between not feeling well and a family reunion.  I'll try to do 2 posts this week/weekend.


For the second week in a row the majority of my CSA share has been the same.  Its a litle difficult to find new things to do with garlic scapes and scallions.  Typically, I throw garlic scapes. scallions, and a little olive oil into my mini food proccessor and make a pesto.  The leftover scapes and scallions I chop up to keep on hand in the fridge, then its ready to throw into eggs, cooked greens, salads or anything else that tickles the fancy.  This week I used both the pesto and the pre-cut scapes/scallions to stuff chicken with.
Kohlrabi is more of a fun challenge.  Ive only gotten kohlrabi in my CSA maybe once a year.  Its a type of cabbage that tastes a bit like broccoli with both the bulb and leaves being deiciously edible raw or cooked.  Kohlrabi can be treated a lot like a potato.  That being said, I decided to make kohlrabi fritters this week, almost like potato pancakes.

Pesto and Spinach Chicken Roulade
2 boneless, skinless chicken breasts
small bunch of spinach (Or use frozen spinach defrosted and drained)
2 tbs minced garlic scapes
2 tbs minced scallions
3 tbs margarine/butter
2 tbs + 2 tbs olive oil
1/4 c pesto of choice

Preheat oven to 425f


In a heavy, oven proof pan (I used my Dutch oven) heat 2 tbs of olive oil, scapes and scallion for 3 minutes.
Add raw spinach and saute until wilted, about 5 minutes, making sure to stir frequently to keep spinach from scorching.


Cut the chicken breasts in half through the middle
*or you can pound them thinly 


Add a thin layer of pesto then the cooked spinach onto thinned chicken breasts.
Starting at the narrowest end, roll chicken up, tuck in open ends, and use toothpicks to secure.


In pan/Dutch oven that you used to saute spinach, heat 3 tbs of margraine and 2 tbs oil.
Add chicken to pan and cook for 3 minutes on each side, until lightly browned.

Place pan of chicken into oven and bake for 15 minutes.

***
Optional White Wine Pan Gravy
1/2 cup dry wine (I used a local semi-dry mead)
2 tbs margarine
1 tbs flour
splash of lemon juice


Remove chicken from pan and cover with foil.
Put pan on medium heat
Add wine, margraine and lemon juice.
Once heated, add flour, whisking constantly until desired thickness


Kohlrabi Fritters
2 c grated kohrabi, drained
2 tbs flour
1 beaten egg
salt & pepper to taste
2 tbs pesto 
*enough vegetable oil to have 1/4 inch in the bottom of a skillet


Grate kohrabi and remove ass much liquid as possible
(you can place in a clean towel and squeeze or, like me, squeeze out the liquid with your hands)


Mix remaining ingredients with the grated kohlrabi


Heat oil in a skillet, enough to be 1/4 inch deep
Form kohlrabi mixture into 1/8 cup ball and press into the hot oil to make a patty
Fry unti brown, about 3 minutes per side

Remove and place on paper towel to absorb excess oil.

Thursday, June 11, 2015

peanut chicken with bok choi

Another summer of fun with vegetable has begun!
I was a little late this year in getting my CSA paperwork in.  By the time I got it in my usual farm was sold out of shares; a blessing and a curse.  Wanting to still receive amazing local, organic veggies, I joined a new farm, Shared Roots Farm.  My first share contained: bok choi, asian greens, pea shoots, spring green, scallions and (my husband's favorite) kale.  The pick up for the share is next door to my friend's art studio.  I picked my share up then she and I spent the afternoon chatting, eating spring greens and pea shoots right from the bag.  My tummy was so happy!  Then came the dilemma, what do I do with bok choi?  I'm sure I must have eaten it raw in summer or rainbow rolls.  Research began.  I had already come up with a great peanut sauce recipe for slaw late last year.  Figuring that bok choi was an Asian vegetable, it must go great with peanut sauce.  A recipe for Peanut chicken with bok choi was born.


Peanut Chicken with Bok Choi over Noodles:
Serves 4, 
Prep time: 10 minutes
Cook time: 10 minutes

4 Chicken breasts, cut into bite size pieces
2 carrots, shaved or thinly sliced
1 large head of bok choi, thinly sliced
noodles of choice (used 1 pack ramen for my husband & 1 pack rice noodles for me)
pea shoots for garnish

PEANUT SAUCE:
1/2 c peanut butter (natural is best)
2/3 c soy sauce (I use gluten free)
1 tbs minced ginger or 1/2 tsp ground
2 tbs minced garlic or 2 tsp powder
2 tbs olive oil
2 tbs cider vinegar
1 tbs honey
3 scallions, chopped
splash of lime juice


Whisk together all peanut sauce ingredients and set aside


Rinse all greens and set aside in colander to allow to dry


Prepare noodles according to package, 1 pack per person
*pro tip: save the flavor packs, they come in handy for things like soups


Heat a large skillet or wok
Toss chicken with half the peanut sauce.
Put chicken in heated wok/skillet and cook through, about 7 minutes.
Add bok choi, carrots and remaining peanut sauce and cook until bok choi is wilted, about 3 minutes


Serve chicken, veggies and pan sauce over noodles.
Garnish with fresh pea shoots.
ENJOY!


Friday, October 10, 2014

Crustless/ Gluten Free Quiche with CSA Greens

So many greens this summer.  I was running out of ideas for collards and chard.  I started blanching and freezing my greens.  Then, I bought too many eggs.  Quiche!  Thats the answer!  Traditionally, quiche is made with spinach.  Why not try other greens?  I used chard for this recipe but I'm sure it would be delicious with collards, too.
As Ive mentioned, Im gluten intolerant.  This recipe is crustless because Im much too lazy to find a recipe to make a gluten free crust.


Crustless Quiche
1 tbs oil
1 onion, finely diced
1 clove garlic, minced
10 oz of greens
5 eggs
3 cups cheese (I used a mix of sharp cheddar and Mexican blend)
1/4 tsp salt
1/8 tsp pepper
**5 slices of ham or bacon (optional), cut small

Preheat oven to 350*, prep a greased 9in round baking dish

In a large skillet or dutch oven heat oil.  Saute onion and garlic in hot oil until soft.  Add greens and ham, cook until greens have lost most of their moisture (about 5 minutes)

In a large bowl beat eggs.  Add cheese, salt and pepper and mix well. 

Add cooked green mixture (be careful that the greens are cooled slightly so that the eggs dont start cooking). 


Pour mixture into pan and bake until egg is set, about 30 minutes.


Allow to cool before serving.  Best served at room temp.

*I made a double batch using thawed greens that I had blanched and frozen in August.  Make sure that they are completely thawed and squeeze out as much water as possible before cooking.  I froze one of the quiches after I had cooked it.  You can just thaw it and eat or you can heat it slightly in a 350* oven for about 10 minutes.

Mexican dinner CSA & gluten free style

I know that I havent been here in a while... ya know... life happens.  I have a back up of 3 blogs, stay tuned for more in the next day or so.

Im sure (or maybe unsure?) Ive mentioned that I have a lot of food issues.  Lactose intolerant, soy intolerant and, most recently, gluten intolerant (luckily, it isnt full Celiac).  You will notice that the recipes I've posted this year are lacking these ingredients.  Yes, there is cheese in a bunch of the recipes but it is low or no lactose cheese.
*Side note for those curious: milk allergy is different from lactose intolerance.  This means that I can still have dairy but it has to be low or no lactose dairy.  Yogurt is a "yes" because it has active cultures that counteract the lactose.  Aged cheeses are a "yes", as a cheese ages the lactose breaks down.  I can each sharp cheddars and Swiss but fresh cheese like mozzarella is totally out without a Lactaid.  Of course, some are more sensitive then others.  My sister is also lactose intolerant but she can eat a couple slices of pizza with only a little effect.  I eat half a slice of pizza without a Lactaid and my stomach will do highly unpleasant things that incapacitate me.  

All that is neither here nor there... on to the food!

Fresh Mexican Dinner
This is a 3 parter:  Taco chicken made with homemade (g/f) taco seasoning
                             fresh Pico de Gallo
                             Spanish Rice in a rice cooker
Full ingredients for all parts:
2 large tomatoes
2 onions (I like and used red onions)
2 cloves garlic
1 lime or 1 tbs lime juice
salt
6oz tomato paste (I dont keep this in the house, although I should.  Below you'll find how I subbed)
2 tbs butter or margarine
1 c rice
2 1/4 c liquid, either water or chicken broth
1 tbs chili powder
1/2 tsp garlic powder
1/4 tsp onion powder
1/4 tsp crushed red pepper
1/4 tsp dried oregano
1/2 tsp paprika
1 tsp pepper
1 lb chicken breast, cooked & shredded (you can buy canned or bake 350* for 25 minutes)


Lets start with the Pico.  This recipe is my adaptation of a recipe adapted from www.earlymorningfarm.com/easy-pico-de-gallo 

Pico de Gallo
2 large ripe tomatoes, diced
1 red onion, finely diced
1 red bell papper, diced (i used what i had: 1 yellow & 1 sm red)
1 clove garlic, minced
Juice of 1 lime or 1tbs lime juice
1 tsp salt
                                       

Combine tomatoes, onion, pepper.  Add garlic, lime and salt, tasting as you go and adjusted to taste.
Refrigerate.  Will keep a couple days.


Next, start the rice.  I used my trust rice cooker.  If you aren't rice challenged like I am, you can make it stove top using the same basic steps.  I didnt have chicken broth so I used water, which tasted just as good. You can also use water to keep the rice vegetarian.  

Spanish Rice
1 cup uncooked rice
2 1/4 cup liquid (I used water but you can use chicken broth)
6oz tomato paste **see below recipe for sub**
2 tbs butter or margarine
1/2 cup diced onion
1 clove garlic, minced
salt & pepper to taste

Place all ingredients into your rice cooker and cook according to cooker's directions.  It may finishing a little liquidy, mix it and let set in your cooker a couple minutes and it should thicken up.

**tomato paste substitution.  
Dice 2 large tomatoes.  Simmer in a heavy pot for 30 minutes.  Use a masher or stick blender to break down tomato.  Simmer another 15 to 20 minutes until thick.  This wont have the smokey tone that paste has.  I still enjoyed it.  You can add a little paprika for a more smokey flavor.


Having a gluten intolerance, Im really careful of seasonings.  Many seasonings and flavors use wheat-based binders and preservatives.  You can find gluten free taco seasoning fairly easy, but why, when you can make it yourself with things most people have on their spice rack

Taco Chicken with homemade Taco Season
seasoning: (good for 1 lb of meat)  
1 tbs chili powder
1/2 tsp garlic powder
1/4 tsp onion powder
1/4 tsp crushed red pepper
1/4 tsp dried oregano (*pro tip: crush dried herbs in palm of hand before adding.  It releases the oil and refreshes it)
1/2 tsp paprika
1 tsp salt
1 tsp black pepper

Combine all season ingredients and whisk well or use a grinder

Taco Chicken (or tofu!) (or ground beef)
1 lb cooked, shredded chicken (or 1 package firm tofu cubed) (or 1 lb ground beef browned)
1 taco seasoning
1/4 cup water


Heat chicken (or tofu) in skillet.  Sprinkle seasoning over meat.  Add water and stir well.  Simmer 5 minutes until water is mostly cooked away.  The water will keep the meat from drying out while cooking. 

Voila!... or Ole?  Serve meat over rice and pico over meat.  Can add cheese and sour cream as you like.  I felt it was lighter and fresher without heavy dairy on it.  Really, using the substitutions, it can be completely vegan.