Friday, August 8, 2014

So Much Kale!!!


So much kale!  One thing you never run short of being a CSA member or having a community garden these days is kale.  The other day my parents, who are part of a community garden, asked what I do with kale.


First is the prep:
I like to rip it from the tough spine and then into pieces that are a little larger then bite size.
Then wash and dry the kale or use a salad spinner
Kale Chips (without a dehydrator)
Toss prepped kale with a drizzle of olive oil
Sprinkle with sea salt and toss again
Lay out on a cookie sheet
Bake 275* for about 30 minutes.  They will be done when they are dry and crisp.
**you can have fun with seasoning.  Try a little chili powder or garlic or Parmesan cheese. 
Kale and Collard Dinner salad
1 bunch prepped kale
1 bunch prepped collard
2 avocado, cubed
4 hard boiled eggs, diced
1 pint cherry or grape tomato
1/2 cup toasted pecans
6 strips of cooked bacon or diced ham
dressing;
1/2 cup of olive oil
juice of 2 lemons (about 1/4c)
2 cloves of minced garlic
2 tsp dijon
1 tsp seas salt
Whisk together dressing ingredients and refridgerate for 1 hour
Toss remaining ingredients together, then coat with dressing

Cooked Kale (or Collards or Chard) Side Dish
3 tbs of olive oil or butter
2 cloves minced garlic
1 small oinion, diced
1 large bunch of prepped Greens
Sea salt and fresh pepper to taste
In a large, heavy bottom pot (I use a dutch oven), sautee onion and garlic in the oil or margaine. 
Add kale/greens.  Mix until coated.  Cook on medium heat until well wilted, it will look very dark and moist.
*I like to add some dried cranberries

Blanching Greens
When in doubt, blanch and save it for later.  Blanching is a way to keep greens fresh, vibrant and preserving their nutrients while waiting it out in the freezer.  

Rip greens into bite size, wash and dry

I like to use a wire basket that folds


Place in a basket in boiling water for 3 minutes


Remove from boiling water and place into an ice bath for 3 minutes.  This stops the cooking process
*This is why I like a collapsible wire basket, it folds into itself keeping the greens from floating.*

Place cooled greens into a towel and squeeze out the excess liquid.
(I just use my clean hands)

Its now ready to freeze.


CSA member Tools of the Trade

Tools of the Trade:
This is my 2nd year being part of a CSA.  I have found a couple things that have made veggie prep and cooking so much easier:


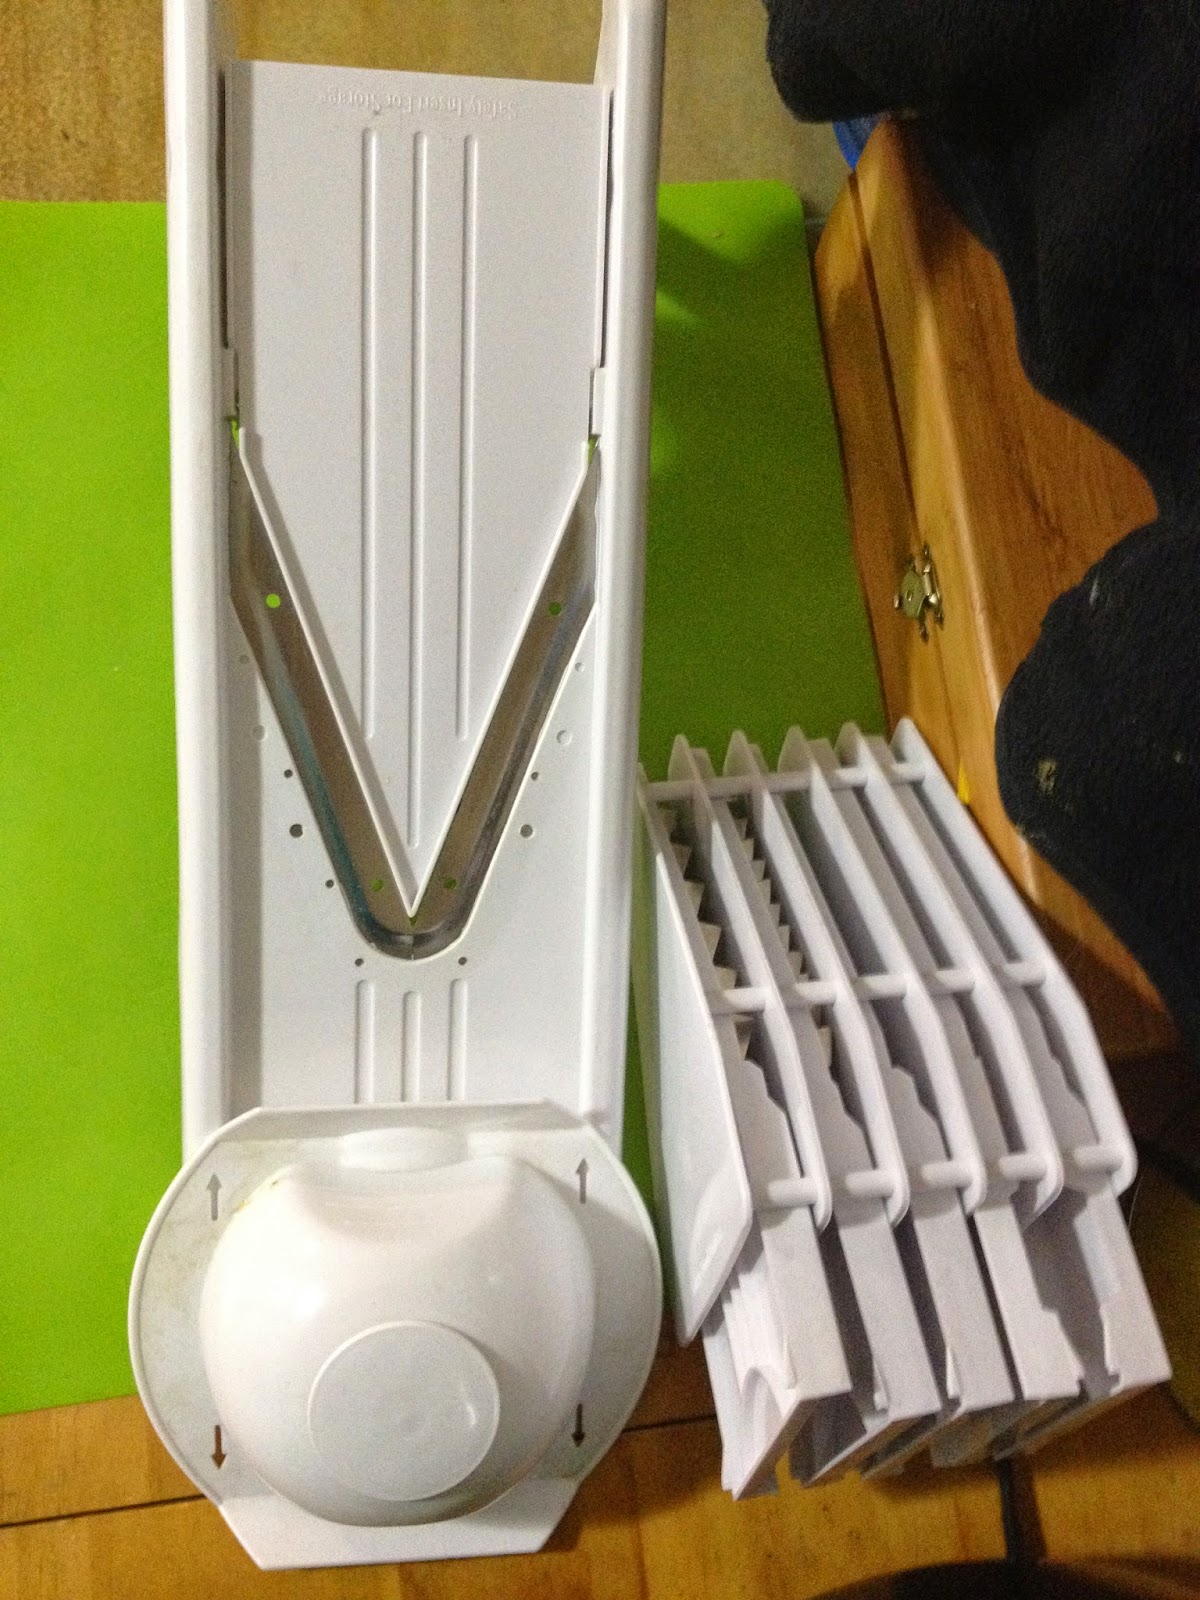
Mandolin Slicer: You can go low grade, like mine, and find them at the big box store for under $20.   Always use the guard!!


Salad Spinner: I had a time trying to find one last year.  This year I found one at the big box store for $5.  The biggest benefit is not the washing but the drying.

Scrap Bucket: I have a large bowl I keep in my freezer for the scraps.  Once that bowl get filled I throw it all in the crock pot with water, salt, pepper and a touch of wine.  Makes an awesome vegetable stock to freeze and use year round.

Wand/Immersion Blender:  My wand blender came with a mini food processor.  The wand part is great to smooth out soups but it is really the mini processor that is essential.  That thing has seen so much pesto.

Dehydrator:  Granted, most drying of vegetables can be done with a low oven.  But its summer so who really wants to heat the house up more.  The good thing about a dehydrator is that it can run over night without much worry that comes with running an oven unattended.
Flexible Cutting Board:  Seems a strange thing to be a "necessity" but when you are dealing with a large amount of vegetables it makes it so much easier and keeps vegetables from going astray as you try to put them into pots.
Rocker Blade Herb Cutter: Again, this is a time saver and a wrist saver.  Plus, if you're like me and have terrible knife skills, it makes you look like a pro.  Mine my parents brought back from a trip to Alaska many years ago.  You can see, its well worn.  

Large Stock Pot with Wire Basket:  This is a multi-purpose tool.  Yet, use it to make vegetable stock or soups, but you can use it to blanch vegetables for freezing or use it for canning. 

CSA pros and cons

What is a CSA?  Community-Supported Agriculture is a way of buying into a farm.
How a CSA works (based on personal experience), generally, is you pay a certain percentage into the farm or commit a certain amount of time and in return you receive products from that farm.
The farm I buy into is Binghamton Urban Farm.  One of the things I really love about my farm is that it also supports an urban youth program, teaching young about agriculture.


Benefits/Pros for me:
Every Friday I go to a local school to pick up a giant bag of locally grown, beautiful, fresh vegetables.  My hands never get dirty, my body never hurts from being hunch over a garden.  I never have to pull a single weed, a dreaded chore in the garden we had as kids.
I love that I never really know what to expect.  As someone who thrives on lists and planning, its a break in personality that I really enjoy.  I enjoy this one thing being completely out of my control.  I like to call it "Fun with Vegetables".  Its really become a fun challenge to try new vegetables and cook in new ways.  Growing up in a home where crimes against vegetables were committed on a regular basis, I had no clue how much I loved vegetables.  Raw, cooked, dehydrated, I'll eat almost any done almost any way.
The price is so right.  We are not people with disposable income.  We get food stamps/SNAP, not much but just the fact that we are eligible for assistance of any kind shows that we arent financially well off.  Our CSA share is a large size and runs about $22 a week for 8 items.  This seems pricey at first glance but when you consider what you would pay at the grocery store for high quality, organic veggies, it really is worth the price. Many CSAs are subsidized, giving people who are low income or on SNAP a discount.  We were able to take advantage of this discount this year but once my husband got a new job we started paying full price again opening another space for a family who might not be able to afford this program.    

Cons:
Really, for me, there are no cons.  I can see cons for other people if they arent adventurous when it comes to vegetables or cooking.  Luckily, my husband and I are food adventurers.  There are a couple things I dont usually eat but even those things I've found a way to cook or use in a way I enjoy them.  Other farms may have the con that you need to commit to volunteer hours, mine does not.  I know for some people that isnt a con, but for me and my medical issues, I cant make commitments like that.


**Next up: tools of the trade

Mysterious disappearances

Im back!  Between new medical diagnosis, crashing computers, spousal mental health issues, moving, moving again, moving back, and a myriad of other things, i was offline from blogging for a while.  Im now gluten-free, new medicated, husband has a new job and I have been able to rehab my old Sony Vaio.
I joined rejoined a CSA I was part of last year.  I was recently asked by the woman who runs it, whom i have been friends with since childhood, if I wouldnt mind posting some things on their Facebook page since I talk about my CSA share on my own Facebook.  What a great time to get back into blogging.  So Im putting the yarn down and typing away.  I have a huge backlog of recipes, both gluten-free and CSA inspired, and a ton of new "homesteading" tips I've learned along the way.

*For the record, I love that I can call my ghetto way of living, "homesteading".

Sunday, February 24, 2013

Mock Tiramisu

I came across an awesome, basic, cupcake recipe (which is sadly lost now) and decided one random Saturday night to make them.  The cupcakes came out looking a little uneven in doneness.  I attempted to remove them from my ancient muffin tins to discover that the only cupcakes that would come out of the tin was the ones that were burnt around the edge.  Cursing and slamming around my kitchen I did my best to remove as much of the cupcakes as possible before pitching the muffin tins into the recycle bin.  After a couple long breathes and a cigarette, I came in to notice my husband's expresso machine sitting on the counter.  I was struck with fix-it genius.  Tiramisu! 


I started by crumbling the cupcakes that I had salvaged.  I had the crumble of 18 cupcakes.


Fresh Expresso


I poured enough expresso on to lightly soak the cupcake crumble


Made a basic powder sugar icing.  For this amount of crumble I used 2 cups of powdered sugar then slowly added expresso a little at a time until it was a consistancy that I wanted.


Spread the icing on top of the crumble.  I sprinkled cocoa powder on top.
I suggest refrigerating for an hour or 2 before serving to allow expresso to soak into cupcake crumble

Thursday, February 7, 2013

crochet walrus free pattern


Crochet Walrus

Supplies
Worsted weight yarn in 2 colors
Eyes (I use buttons)
I/9 5.50mm hook
Polyfill
Tapestry needle

Ch = chain
Sc = single crochet
Dec = decrease sc2tog (single crochet 2 together)
Inc = increase 2 sc in 1 sc
*  *  = repeat between *  *
BLO = crochet in Back Loop Only

Patterns worked in continuous rounds

Muzzle
Ch 9 in accent color
1)      starting with 2nd from hook, sc in next 7 ch, inc in last, continue on other side of chain, sc in next 7 ch, inc in last ch. (18)
2)      *inc, sc in next 2* repeat (24)
3)      *inc, sc in next 3* repeat (30)
4)      *inc, sc in next 4* repeat (36)
5)      – 7) sc around
Finish leaving long enough tail to attach muzzle with

Create nostrils: find center, move over 2 from center (counting center as 1).  With tapestry needle and main color go in at row 5, coming out at row 3.  Sew back and forth between row 3 & row 5 about 4 times (see photo)

Attach muzzle after row 14 of body.  The top center of muzzle should be attached to center of starting ring of body.  Sides of muzzle should attach around row 8 of body.  Bottom center of muzzle should attach to row 10 of body.  This will make it puff out a little.  Stuff before fully attached.


Body
Stuff as you go along
Ch 2
1)      6 sc in 1st chain (6)
2)      *inc* repeat (12)
3)      *inc, sc in next* (18)
4)      *inc, sc in next 2* (24)
5)      *inc, sc in next 3* (30)
6)      *inc, sc in next 4* (36)
7)      *inc, sc in next 5* (40)
8 – 12)  sc around (40)
13)    *inc, sc in next 6* (46)
14)    *inc, sc in next 7* (52)
attach eyes and muzzle
15 - 17) sc around (52)
18)    *dec, sc in next 7 (46)
19)    sc around (46)
20)    *dec, sc in next 6* (40)
21)    – 26)  sc around (40)
27)    *dec, sc in next 5 (36)
28 – 29) sc around (36)
30)   *dec, sc in next 4* (30)
31 – 32) sc around (30)
33)  *dec, sc in next 3* (24)
34- 35)  sc around (24)
36)  *dec, sc in next 2 (12)
37 – 38) sc around (12)
39)  *dec, sc in next* (6)
40 – 41) sc around (6)
42) *dec*
finish and bury ends in body


Flippers  (make 2 in body color)
Ch 6
1)      starting with 2nd from hook, sc in next 4 ch, inc in last, continue on other side of chain, sc in next 4 ch, inc in last ch 
2)      *inc, sc in next 2* repeat
3)      – 4) sc around
5)    *inc, sc in next 3* repeat
6)      sc around
7)      *dec, sc in next 2* repeat
8)      *dec, sc in next* repeat
9)      – 12)  sc around
Finish by sewing shut front to back.  Leave enough tail to attach. 

With tapestry needle attach parallel to side of muzzle between rows 15 and row 20 of body. 


 Tail (in body color)
Ch 32 work BLO
1)      ch1, sc in next 15, dec 2 times, sc in next 13, ch 3, turn
      2 – 3) ch 1, (in first ch of ch 3) sc in next 15, dec 2 times, sc in next 14, ch 2, turn
      4)   ch 1, (in first ch of ch 2) sc in next 15, dec 2 times, sc in next 14, ch 1, turn
      5)   ch 1, sc in next 14, dec 2 times, sc in next 12, turn
      6)   ch 1, sc in next 10, dec 2 times, sc in next 12, turn
      7)   ch 1, sc in next 10, dec 2 times, sc in next 8
       Finish leaving enough tail to attach
       Attach center of first 4 rows to center, underside, of  last 6 rows of body


 Add whiskers as a nice finishing touch:


** I dont believe in charging for patterns.  I offer my pattern for free.  I do, however, expect to be credited for it.  Thanks!  If you have any questions, feel free to message me.  Comments are always appreciated. 

Tuesday, February 5, 2013

Homemade dishwasher detergent and hand soap

Both of the projects here are taken from other people.  I would reference them but the recipes I have here are amalgamations of their recipes.  Basically, I tweaked it for my own liking


Homemade Hand Soap
1 bar of antibacterial soap, grated
8 cups of water

Bring water to a boil in medium pot
Remove pot from heat then add grated soap.  Stir until soap is melted/dissolved
Let mixture set for 15 minutes then stir again
Let soap set for 8 hours to overnight.  
Use a mixer or masher to break it up.  If it seems too thick, add more hot water while mixing
Soap should be ... well... snotty in consistency.
Pour into container.  
*I made a double batch.  I was able to fill 2 foaming pumps, 1 regular pump, a well rinsed gallon bleach container and 4 24 oz soda bottles. 
IF YOU USE FOAMING MIX HALF WATER HALF SOAP MIX
.


Dishwasher Detergent
1 cup Borax
1 cup washing powder**
1/2 cup Lemi-shine/ citric acid OR 4 pkg s/f lemon koolaid
1/2 cup kosher salt
white vinegar

Mix all the dry ingredients and store in airtight container.  
(I used a coffee canister.)
Use 1 TBS per dishwasher load.  Add vinegar to the rinse compartment.

I did find that there was a little film on gladware/tupperware but otherwise everything came out sparkling.

**You can make your own washing soda by using baking soda.  You can use double the amount of baking soda as the recipe calls for washing soda.  But there is another way!
Sprinkle baking soda on a cookie sheet.  Bake at 400 for 30 minutes.